Steering front wheels Tyrrell P34
8. Feb 2007, 02:21
In the subject of the Nacional Pescara, http://www.iphpbb.com/board/ftopic-4906 ... 9-226.html it is spoken of the direction that I have put to him to the car. This that I present/display here it is another way to make a direction that uses for a P34 which not yet I have finished
I hope that it is not very difficult to explain this. The translation is of google and not if what you are going to read it is what attempt to explain.
wheels has five pieces removed from a ball-point pen, a labeller and of clamps for the hair.
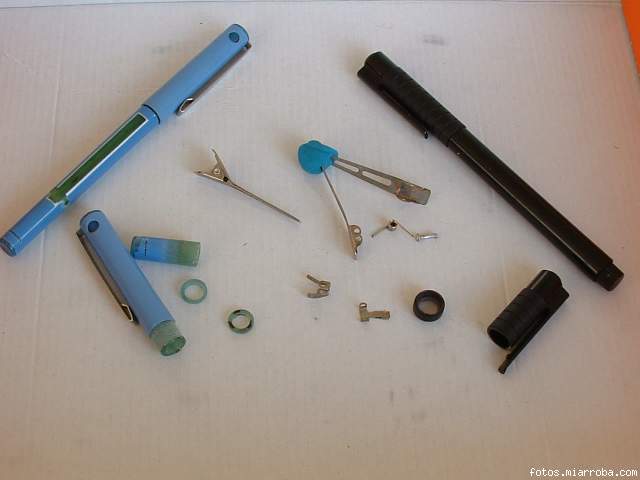
- A piece with a greater diameter (black). It will be the external part of the rim.
- Three equal pieces (greenish) that fit within previous the black piece. Of these three, the central piece will be frees. The other two will go glued on the inside and in the ends of the black piece
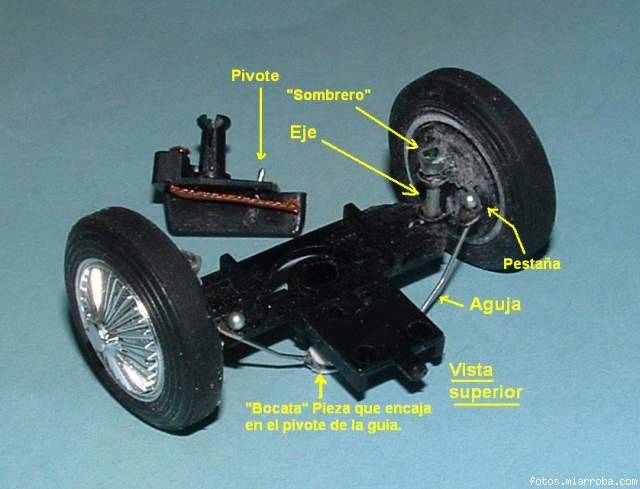
- Of metallic hair clips we cut and we worked the part where this the movable axis. We give a form him of “C“ and left an extension where wrath the rod of control of the direction.
The metallic part we glued it in the central piece that is the one that is to turn freely. We both prepared axes with plastic of 2mm. In this photo we see that single they are worked in a side. We make a cut that will serve to us as wharf and two “projections” to fit the metallic piece.
Assembly:
We placed the three green pieces within the black, but single we glued those that go in the ends.
The power station with the metallic piece is frees.
We prepared aluminum stars (softdrink can) that we glued in the side of outside the rim. Valves of burner to finish the rim.
In the cradle:
We mounted the wheels in its axis.
With needles we connected the two wheels of he himself axis. These rods in center have a form of “U” that it connected both axes to the guide.
We prepared a large stone bench where wrath the set.
We have to in center put a piece (like a horizontal swing), that invests the movement of an axis and the other. The previous axis is the one that takes the direction from the guide.
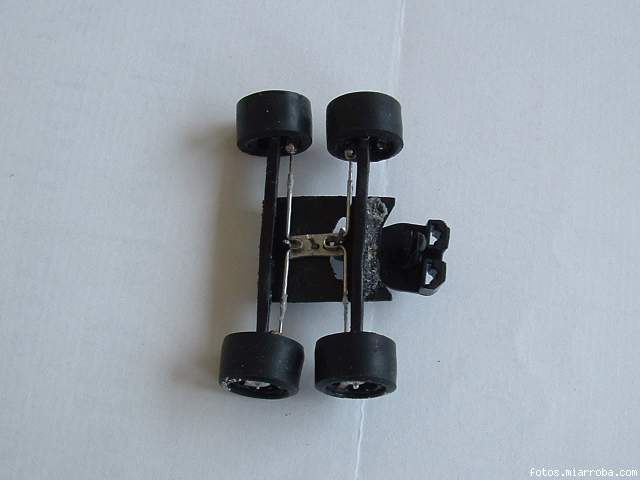
In the car:
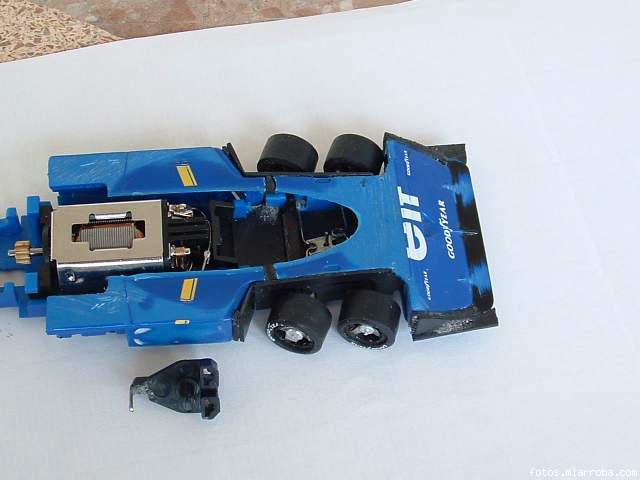
We see the P34 (without finishing) with the mounted axes and the separated guide.
To observe the prolongation that has the guide to take the movement to the axes.
I hope that the translation of at least one devises. Luckily and of being necessary, some companion will put a little order
Andres: Si hay un error "gordo" tu mismo
Saludos,
Frederic
I hope that it is not very difficult to explain this. The translation is of google and not if what you are going to read it is what attempt to explain.
wheels has five pieces removed from a ball-point pen, a labeller and of clamps for the hair.
- A piece with a greater diameter (black). It will be the external part of the rim.
- Three equal pieces (greenish) that fit within previous the black piece. Of these three, the central piece will be frees. The other two will go glued on the inside and in the ends of the black piece
- Of metallic hair clips we cut and we worked the part where this the movable axis. We give a form him of “C“ and left an extension where wrath the rod of control of the direction.
The metallic part we glued it in the central piece that is the one that is to turn freely. We both prepared axes with plastic of 2mm. In this photo we see that single they are worked in a side. We make a cut that will serve to us as wharf and two “projections” to fit the metallic piece.
Assembly:
We placed the three green pieces within the black, but single we glued those that go in the ends.
The power station with the metallic piece is frees.
We prepared aluminum stars (softdrink can) that we glued in the side of outside the rim. Valves of burner to finish the rim.
In the cradle:
We mounted the wheels in its axis.
With needles we connected the two wheels of he himself axis. These rods in center have a form of “U” that it connected both axes to the guide.
We prepared a large stone bench where wrath the set.
We have to in center put a piece (like a horizontal swing), that invests the movement of an axis and the other. The previous axis is the one that takes the direction from the guide.
In the car:
We see the P34 (without finishing) with the mounted axes and the separated guide.
To observe the prolongation that has the guide to take the movement to the axes.
I hope that the translation of at least one devises. Luckily and of being necessary, some companion will put a little order
Andres: Si hay un error "gordo" tu mismo
Saludos,
Frederic
8. Feb 2007, 02:21
8. Feb 2007, 02:22
En el tema del Nacional Pescara, se habla de la dirección que le he puesto al coche. Este que presento aquí es otra manera de hacer una dirección que utilice para un P34 que aún no he acabado.
Espero que no sea muy difícil explicar esto. La traducción es del google y no se si lo que vais a leer es lo que intento explicar.
La llanta tiene cinco piezas sacadas de un boligrafo, un rotulador y de unas pinzas para el pelo.
-Una pieza con un diámetro mayor (negro). Será la parte externa de la llanta.
-Tres piezas iguales (verdosas) que encajan dentro de la pieza negra anterior. De estas tres, la pieza central quedará libre. Las otras dos irán encoladas por dentro y en los extremos de la pieza negra
-De unas pinzas de pelo metálicas cortamos y trabajamos la parte donde esta el eje móvil. Le damos una forma de “C“ y dejamos una extensión donde ira la varilla de mando de la dirección.
La parte metálica la encolamos en la pieza central que es la que ha de girar libremente.
Preparamos los dos ejes con plástico de 2mm. En esta foto vemos que solo están trabajados en un lado.
Hacemos un corte que nos servirá de muelle y dos “tetones” para encajar la pieza metálica.
Montaje:
Colocamos las tres piezas verdes dentro de la negra, pero solo encolamos las que van en los extremos. La central con la pieza metálica queda libre.
Preparamos unas estrellas de aluminio (lata de refresco) que encolamos en el lado de fuera de la llanta.
Unas válvulas de mechero para acabar la llanta.
En la cuna:
Montamos las ruedas en su eje.
Con agujas conectamos las dos ruedas del mismo eje. Estas varillas tienen en el centro una forma de “U” que conectara ambos ejes a la guía.
Preparamos una bancada donde ira el conjunto.
Hemos de poner una pieza en el centro (como un columpio horizontal), que invierta el movimiento de un eje y del otro. El eje anterior es el que toma la dirección desde la guia.
En el coche:
Vemos el P34 (sin acabar) con los ejes montados y la guía separada. Observar la prolongación que tiene la guía para llevar el movimiento a los ejes.
Espero que la traducción de por lo menos una idea. Por suerte y de ser necesario, algún compañero pondrá un poco de orden
Saludos,
Frederic
P.D. Andres: Si hay un error "gordo" tu mismo
8. Feb 2007, 11:33
The Pictures speak for itself.
I think it is clear how you made it. Thank you for sharing.
:top
Slotty
I think it is clear how you made it. Thank you for sharing.
:top
Slotty
9. Feb 2007, 12:08
slotty hat geschrieben:The Pictures speak for itself.
I think it is clear how you made it. Thank you for sharing.
:top
Slotty
Hallo Slotty, da Du das offensichtlich verstanden hast, erkläre mir doch bitte mal wo sich die Achsstummel befinden, die die Räder an den Lenkern halten, so daß die Räder sich frei drehen können. Ich sehe sie nirgends und auch in der Erläuterung finde ich nichts darüber.
Gruß Ted
9. Feb 2007, 14:39
Hi Ted,
kann ich dir gerne sagen.
Ich sehe das so, dass die Felgen durchgebohrt sind und dass ganze dann mit Draht befestigt wird.

Kann natürlich auch sein, dass ich mich da irre.
Gruß Slotty
Hi Frederic,
we have a little discussion here on how you fastened the front wheels.
Maybe you can show us.
Regards
Slotty
9. Feb 2007, 19:17
Hi Frederic
PERFEKT!!
This steering looks very nice!
Good Idea whith the "oposite" steering mechanism!!!!
Which scale is the car?
Best regards
Erk
PERFEKT!!
This steering looks very nice!
Good Idea whith the "oposite" steering mechanism!!!!
Which scale is the car?
Best regards
Erk
9. Feb 2007, 21:18
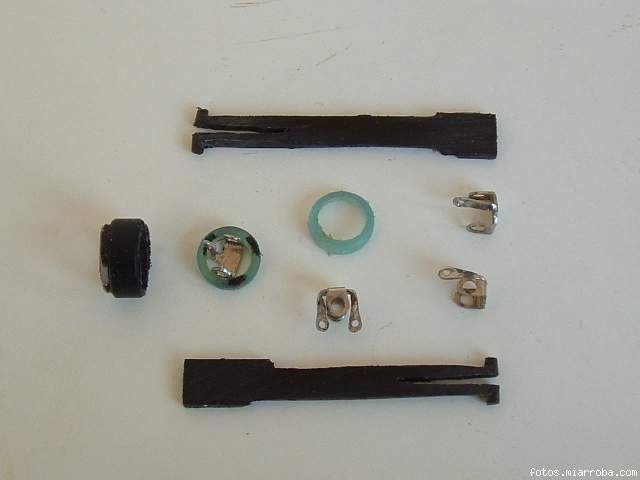
In the second photo, you can see two black rigid plastic pieces (2mm) because when I took the photo only were finished in one side. The piece it's symetric, they are both axes.
It has two projections (up & down), that are where it goes anchored the metallic piece.
In order to be able to put the axis within the metallic piece, it along has that cut that works like a wharf.
To remember that the plastic piece where this stuck the metallic piece, turns freely within the wheels.
Erk: Tyrrell P34 1/32 scale is of the collection “Altaya” and is the same that the Exin/SCX
En la segunda foto, podeis ver dos piezas negras de plástico rigido (2mm) que solo estaban acabadas en un lado. Son los dos ejes.
Tiene dos tetones (arriba y abajo), que es donde va anclada la pieza metálica.
Para poder poner el eje dentro de la pieza metalica, tiene ese corte a lo largo que funciona como un muelle.
Recordar que la pieza de plástico donde esta pegada la pieza metalica, gira libremente dentro de la llanta.
El tyrrell P34 a escala 1/32 es de la colección "Altaya" y es el mismo que el Exin/SCX
10. Feb 2007, 14:29
EMPO Z102 hat geschrieben:In the second photo, you can see two black rigid plastic pieces (2mm) because when I took the photo only were finished in one side. The piece it's symetric, they are both axes.
It has two projections (up & down), that are where it goes anchored the metallic piece.
In order to be able to put the axis within the metallic piece, it along has that cut that works like a wharf.
To remember that the plastic piece where this stuck the metallic piece, turns freely within the wheels.
Erk: Tyrrell P34 1/32 scale is of the collection “Altaya” and is the same that the Exin/SCX
En la segunda foto, podeis ver dos piezas negras de plástico rigido (2mm) que solo estaban acabadas en un lado. Son los dos ejes.
Tiene dos tetones (arriba y abajo), que es donde va anclada la pieza metálica.
Para poder poner el eje dentro de la pieza metalica, tiene ese corte a lo largo que funciona como un muelle.
Recordar que la pieza de plástico donde esta pegada la pieza metalica, gira libremente dentro de la llanta.
El tyrrell P34 a escala 1/32 es de la colección "Altaya" y es el mismo que el Exin/SCX
Hi Frederic,
what we do not understand is how the the wheels are connected to the metallic steering part so that they can rotate. Are the centers of the wheel rims drilled through and pin needles stuck through and soldered to the metal U - bracket steering part ?
Ted
10. Feb 2007, 14:35
slotty hat geschrieben:Hi Ted,
kann ich dir gerne sagen.
Ich sehe das so, dass die Felgen durchgebohrt sind und dass ganze dann mit Draht befestigt wird.
Slotty
Hi Slotty, grundlegend erschien mir das auch so, die runden Köpfchen hatte ich schon gesehen. Nur war mir das Ganze eben, gemessen am Aufwand eine Ackermann - Steuerung an einem P-34 hinzukriegen, zu wenig modellmäßig, da am Original derartige Knubbel im Zentrum der Felge nicht existieren.
Aber es wird so sein.
Nichtsdestotrotz - eine geniale Idee mit den Haarklammern ! Da schlägt man einen ganzen Fliegenschwarm mit einer Klappe ! Wenn ich dran denke, wie aufwändig ich die Ackermann - Steuerung bei meinen Railcars realisiert habe...
Gruß Ted
12. Feb 2007, 02:44
I am going to try to explain it of another way to see if it is understood better:
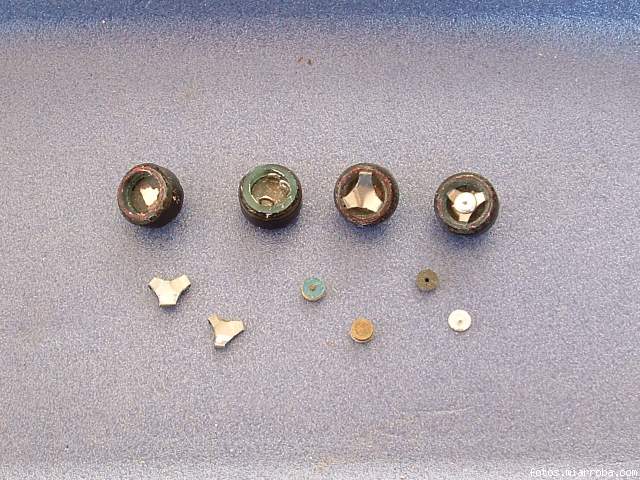
-The wheels is made up of: 2 + 1 + 3 + 4
-Piece number 1 he is but the great one, is the external part.
-Pieces 2, 3 and 4 go inside, but…
… Piece number 2 and the 4 are glued to the ends and…
… Piece number 3 is frees, is not had to glue, so that it can roll (to turn) within the wheels.
-Piece number 3 is left between the 2 and the 4 that hold it within the wheels.
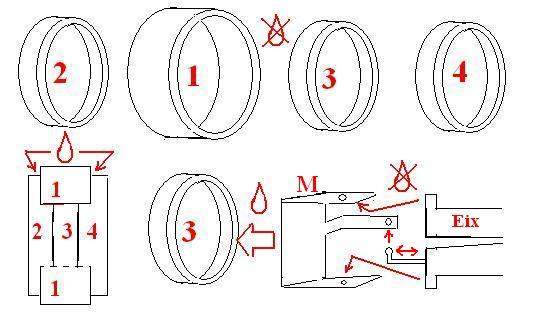
-The metallic piece (M) that has form of “U” goes glued within the piece number 3. To remember that is the one that rolls freely within the wheels.
-The axis (eix) is of plastic, a piece and goes of side to side of the car. Their ends go put without gluing (free) in the metallic piece (m).
-Of this form the metallic piece (M) can turn to right and left. As it goes stuck to the piece number 3, this also can turn and as it does not go glued within piece number 1, also it can roll.
This metallic piece in “U” has an prolongation in a side. It has a hole where it goes put a needle that serves as control rod of the Steering front wheels (direction).
This rod (needle) arrives until the guide of the car.
The control of the direction (Steering front wheels) made up of the prolongation of the metallic piece (M) and a needle that arrives at the guide, is similar to the one of this National Pescara
Voy a intentar explicarlo de otra manera a ver si se entiende major:
-La llanta se compone de: 2 + 1 + 3 + 4
-La pieza 1 es la grande, es la parte externa.
-Las piezas 2, 3 y 4 van dentro, pero...
... La pieza 2 y la 4 están encoladas a los extremos y...
... La pieza 3 queda libre, no se ha de encolar, para que pueda rodar (girar) dentro de la llanta.
-La pieza 3 queda entre la 2 y la 4 que la sujetan dentro de la llanta.
-La pieza metálica (M) que tiene forma de “U” va encolada dentro de la pieza 3. Recordar que es la que rueda libremente dentro de la llanta.
-El eje (eix) es de plástico, de una pieza y va de lado a lado del coche. Sus extremos van metidos sin encolar (libres) en la pieza metálica (M).
-De esta forma la pieza metálica (M) puede girar a derecha e izquierda. Como va pegada a la pieza número 3, esta también puede girar y como NO va encolada dentro de la pieza 1, también puede rodar.
-Esta pieza metálica en “U” tiene una prolongación en un lado. Tiene un agujero donde va metida una aguja que sirve de varilla de mando de la dirección.
Esta varilla (aguja) llega hasta la guía del coche.
-El mando de la dirección compuesto por la prolongación de la pieza metalica (M) y una aguja que llega a la guia, es parecido a la de este Nacional Pescara.
-The wheels is made up of: 2 + 1 + 3 + 4
-Piece number 1 he is but the great one, is the external part.
-Pieces 2, 3 and 4 go inside, but…
… Piece number 2 and the 4 are glued to the ends and…
… Piece number 3 is frees, is not had to glue, so that it can roll (to turn) within the wheels.
-Piece number 3 is left between the 2 and the 4 that hold it within the wheels.
-The metallic piece (M) that has form of “U” goes glued within the piece number 3. To remember that is the one that rolls freely within the wheels.
-The axis (eix) is of plastic, a piece and goes of side to side of the car. Their ends go put without gluing (free) in the metallic piece (m).
-Of this form the metallic piece (M) can turn to right and left. As it goes stuck to the piece number 3, this also can turn and as it does not go glued within piece number 1, also it can roll.
This metallic piece in “U” has an prolongation in a side. It has a hole where it goes put a needle that serves as control rod of the Steering front wheels (direction).
This rod (needle) arrives until the guide of the car.
The control of the direction (Steering front wheels) made up of the prolongation of the metallic piece (M) and a needle that arrives at the guide, is similar to the one of this National Pescara
Voy a intentar explicarlo de otra manera a ver si se entiende major:
-La llanta se compone de: 2 + 1 + 3 + 4
-La pieza 1 es la grande, es la parte externa.
-Las piezas 2, 3 y 4 van dentro, pero...
... La pieza 2 y la 4 están encoladas a los extremos y...
... La pieza 3 queda libre, no se ha de encolar, para que pueda rodar (girar) dentro de la llanta.
-La pieza 3 queda entre la 2 y la 4 que la sujetan dentro de la llanta.
-La pieza metálica (M) que tiene forma de “U” va encolada dentro de la pieza 3. Recordar que es la que rueda libremente dentro de la llanta.
-El eje (eix) es de plástico, de una pieza y va de lado a lado del coche. Sus extremos van metidos sin encolar (libres) en la pieza metálica (M).
-De esta forma la pieza metálica (M) puede girar a derecha e izquierda. Como va pegada a la pieza número 3, esta también puede girar y como NO va encolada dentro de la pieza 1, también puede rodar.
-Esta pieza metálica en “U” tiene una prolongación en un lado. Tiene un agujero donde va metida una aguja que sirve de varilla de mando de la dirección.
Esta varilla (aguja) llega hasta la guía del coche.
-El mando de la dirección compuesto por la prolongación de la pieza metalica (M) y una aguja que llega a la guia, es parecido a la de este Nacional Pescara.
14. Feb 2007, 10:20
EMPO Z102 hat geschrieben:I am going to try to explain it of another way to see if it is understood better:
Hi EMPO,
THANK YOU VERY MUCH ! NOW IT IS ABSOLUTELY CLEAR.
I admire the expense of work AND the creativity that is behind this unususal way way of making and mounting wheels.
Ted
Bei iphpbb3.com bekommen Sie ein kostenloses Forum mit vielen tollen Extras
Forum kostenlos einrichten - Hot Topics - Tags
Beliebteste Themen: Bau, USA, Mode, Erde, Bild
Impressum | Datenschutz